We’ve a bunch of exterior shoots coming up and i’ve been seriously considering the A7s over the FS700 because if it’s size and the fact that it can be rigged and gimballed easily.
Sony A7s - how to expose - cine or log?
We’ve a bunch of exterior shoots coming up and i’ve been seriously considering the A7s over the FS700 because if it’s size and the fact that it can be rigged and gimballed easily. Last article we looked at issues of resolution and increasing colour depth by downsampling. We know that approach works well.
Overall the dynamic range of the A7s appears to be roughly the same as the FS700, around 10 to 11 stops. (And if you read the rest of this blog you’ll know that i believe camera manufacturers overcook their marketing for dynamic range by a long way). It’s true that we’re not recording RAW from the A7s, and with RAW you have the ability to ‘develop’ it and recover more highlight detail. The lack of RAW is a big downside. Also the A7s produces only an 8 bit output at UHD resolution. But we do have two broad choices, do we set the A7s to the Slog2 profile or stick with one of the Cine versions?
What’s the difference?
Slog2 captures the scene as a log curve, it gives a flatter looking result with raised blacks and desaturated colour. When you apply a suitable Slog2 LUT in post you get back the full dynamic range of the scene. Log redistributes the light values so that they're more even, from shadows to highlights. In theory every stop of real light is recorded with roughly the same number of code values (the actual numbers, 0 to 255 for 8 bits)
The Cine curves on the other hand apply a more generic gamma type S curve which crushes the blacks and the highlights and gives more tonality to the mid tones. You can modify the curve a little by applying black gamma and knee settings but broadly speaking you have a simple gamma curve.
Why is this even an issue? Well the camera is only doing 8 bit output. This means that on a code value scale of 0 to 255 the distribution of light values is very important. If you realise that Slog2 has raised blacks for example, already you’ve may have eaten into your 255 steps and wasted a bunch of them representing nothing. (I say may)
If the camera was outputting 10bit it would be a no brainer, SLog2 all the time. But it’s not and there’s a very real chance that by distributing the light values so evenly the skin tones and mid tones will suffer. What i mean is that we may not have enough possible values to cover the subtle tonality of a face at a particular exposure. Conversely the cine curve could handle highlights quite poorly, rolling them off very quickly and that can give a very video-y looking image.
The purpose of this is to compare like for like Slog2, Cine1 and Cine4 and explore the distribution of code values in the original movie files. This is quantifiable and unarguable. So long as my technique is accurate!
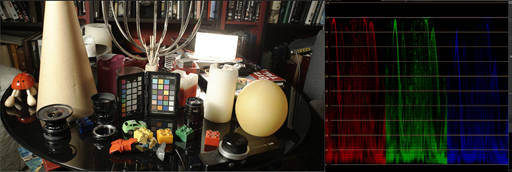
This can be quite challenging because QuickTime will do things to files depending on what the requesting application asks for, not least turn the internal YUV data into RGB. And that step alone can hide the truth. That’s an important point. When we say 8 bit output we don’t mean 8 bit RGB, but 8 bit YUV. YUV is a way of storing colour by separating the luminance or brightness of a scene (the Y) from the colour differences (the UV). It’s a different way of storing image data, meaning that colour can be sampled differently (less resolution, or sampling).
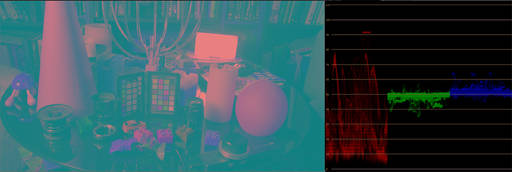
When the YUV is combined into RGB So what i’m aiming to do is to compare the distribution of values in the original YUV data, not the RGB data. To do this i can open the file in Nuke and set the output to raw data. This gives me the YU and V in the RG and B channels. I am able to process in YUV and combine it back to RGB myself. But the first port of call is to look at how an image looks with the resulting YUV waveform. For the purpose of this post i am just looking at Y, luminance. The next post will deal with colour gamuts.
This above images show a scene, with a corresponding RGB and then YUV waveform.
Our methodology.
We will shoot a 13 stop wedge chart, we will clip to the same point on the chart, clipping is one area that is definitive whereas it's difficult to say when we're at black because noise takes over shadows. We’ll do this for Slog2, Cine1 and Cine4. This will be done at UHD using the waveform on the Odyssey 7Q+ to tell the clipping point. We’ll then process this UHD files as raw YUV and denoise in that space too. When we ask quicktime for the data, will will specify r4fl pixel format which is 32 bit float. (see side note)
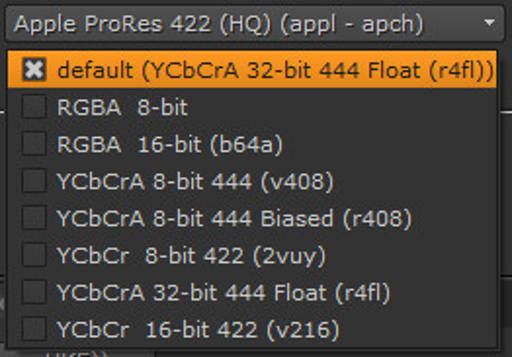
Pixel Formats. Quicktime can store data internally in a number of differen ways. At the same time an application can ask for data in a variety of pixel formats. In some cases QT will be converting internally and this is the source of many QT based issues, a mismatch between in and out. Each pixel format does change the data, QT will dither or add data in some cases. It's a complete minefield that applications cover up.
The resulting charts and the waveforms are presented below.
I’m using Nuke X and i know the waveform in that will show me the banding in the file. This means i can physically count the steps in the file, the actual 8 bit code values. Even though the O7Q outputs 10 bit files, the source into it is still 8 bit, and those 8 bits are just scaled into the 10 bits. Quicktime often tries to dither the data too, so i’ve been careful to make sure it doesn’t in this case.
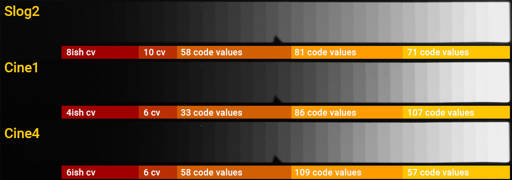
So without further ado, here are the 3 waveforms for each gamma curve along with the number of code values for each stop of light. Counting from clipping down. Pretty cool huh?
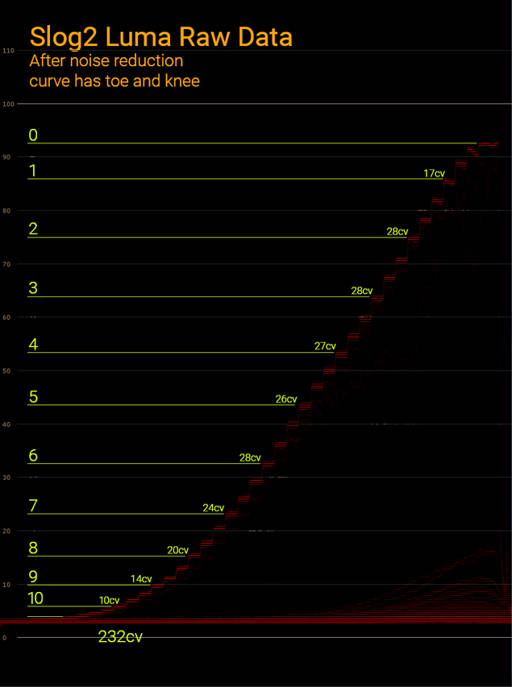
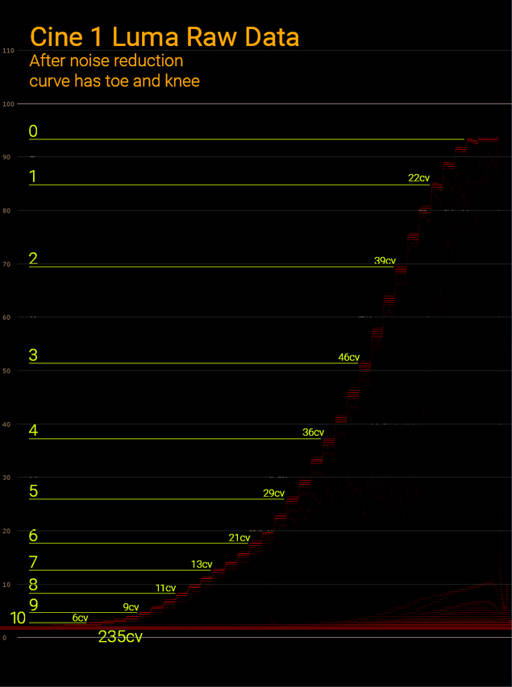
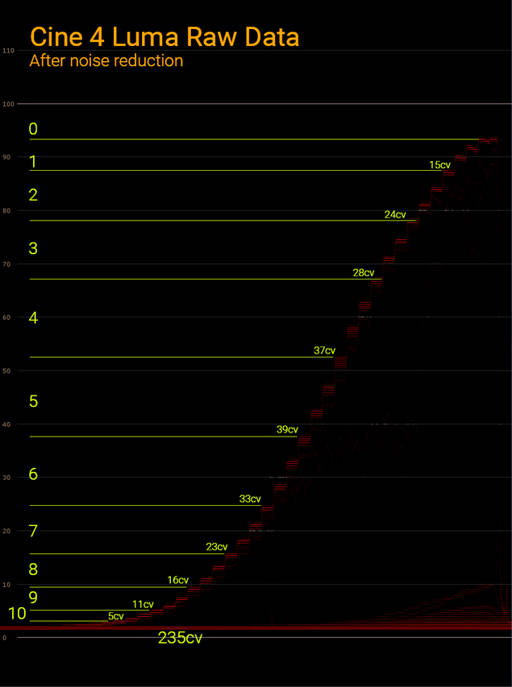
We can see that all curves have a roll off at the top and the bottom, but the Slog is showing fairly equal stops and the two Cine curves show very different distribution of values. This is great. And useful. Overall the range is between 10 and 11 stops, but you can see that in the shadows in all cases there are so few code values used that it’s pretty much mush down there - as we touched on in another article this is pretty much true of all digital cameras.
On the above waveform images the red lines can be counted, these are actual real code values and i've totalled them up for each group of 3 steps (each step is 1/3 stop). Sanity checking shows that the log format is pretty much the same, around 28 values for each stop.
If we take this and overlay this information on the step wedge we can see how many values each group of 3 stops is using. The images breaks the wedges into 3 areas of 3 stops, highlights, mids and shadows. The values underneath show how many code values are allocated in each section.
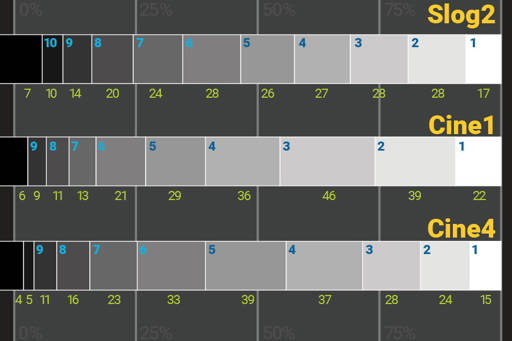
Finally it is very useful to show the relative distribution of the code values in a single illustration. Each stop shown here has a width based on the number of code values it occupies.
So what can we learn from this?
We have to expose for the scene we're shooting (tell us something we don't know, right). Work out where your skin is going to be. Convention in Slog says mid-grey should be at 32%, this is code value 75 in 8 bit. On our Slog chart above this puts it 6th stop from the top. On an A7s clearly that is too low, it's very noisy down there. This is one of the reasons people like to expose higher, then reduce the exposure in post. Personally i'd expose it 42 and higher.
On Cine1 we protect highlights quite well, i think this would be a good alternative for outdoor shooting, the shadows are quite crushed (they're noisy anyway) and the largest range is give to mid tones. If you were to expose for skin 4 stops down you've still have 4 stops for highlights and the highlights on a face would have plenty of space to grow.
If you expose up on SLog2 and bring the exposure down you are basically crushing your shadows, loosing range. So the advantage of Slog2 is sort of lost. You perhaps may get better tonality using Cine1. This is an area i will be exploring.
Cine4 crushes highlights a little and gives more to the mid and shadows, if protecting highlights isn't so important this may be a good general choice.
I think what's clear is that all of the curves are good and Slog2 isn't the be all and end all. They all have roughly the same range, the major differences is how that range is distributed. Also the post workflow for Slog2 is standard, whereas bringing Cine1 and Cine4 into a linearised workflow will take more work.
The next part of this will explore the Colour side of things more and try to investigate why we have so many modes to choose from (when the camera itself has a fixed gamut). And why the widest mode isn't necessarily the best.
We will also take a look at the kinds of modifications we can do to the curves too, using the picture profile settings. Whilst you won't gain any more range you can affect the distribution of that range.
We'll also be looking at treating rolling shutter and a few other A7s specific issues